Add Row
Add Element
cropper
update
Home Owners Vibes
update
Add Element
  • Home
  • Categories
    • interior
    • decor
    • inspiration
    • atmosphere
    • trends
    • design
    • comfort
    • Food & Travel
    • House Hold Tips & Ideas
    • home
    • Home Improvement Tips
    • Roofing & Exterior Maintenance
    • Interior Remodeling & Design
    • Budgeting & Financing for Home Projects
    • Hiring & Working with Contractors
    • Landscaping
    • Garden
    • Real Estate
June 30.2025
2 Minutes Read

Master the 3-2-1 Method for Ribs and Impress Your Guests

Perfectly cooked BBQ ribs using 3-2-1 method.

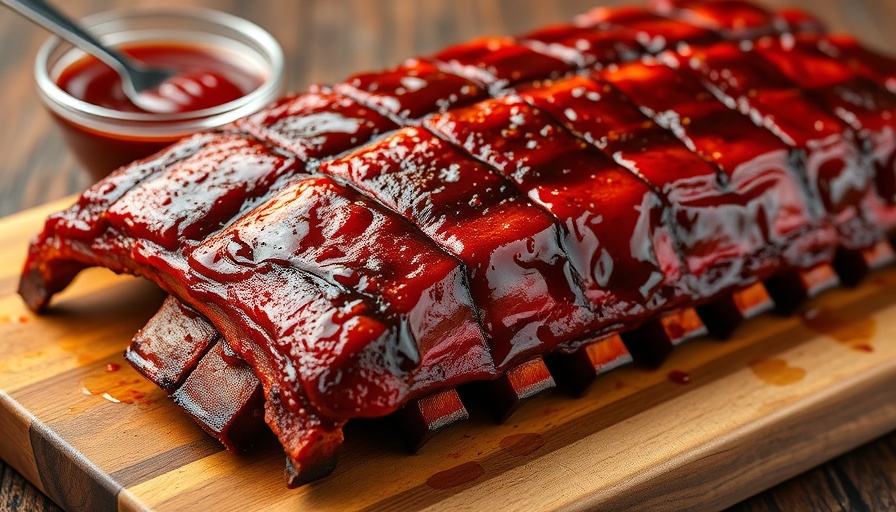
Unlocking the Flavor: Why the 3-2-1 Method Rocks for Home Cooks

If you're a home cook looking to impress family and friends with perfectly cooked ribs, look no further than the 3-2-1 method. This technique helps you achieve tender, flavorful ribs without the constant attention that traditional barbecue methods often demand. The beauty of the 3-2-1 method lies in its simple breakdown: 3 hours of smoking, 2 hours wrapped in foil, and 1 hour naked on the grill, topped with your favorite sauce.

Getting Started: The Basics of the 3-2-1 Method

Let's take a closer look at how the 3-2-1 method works:

  • Step 1: Smoking - For the first three hours, ribs are smoked unwrapped at 225 degrees. This infuses them with that signature smoky flavor that barbecue lovers crave.
  • Step 2: Wrapping - Next, you wrap the ribs in foil with a little liquid (like apple cider) for two hours, creating a steamy environment that breaks down tough connective tissue, ensuring tenderness.
  • Step 3: Finishing Touches - Finally, you unwrap the ribs for one last hour, allowing the sauce to caramelize and deepen in flavor while achieving that coveted rib 'bite.'

Why Opt for the 3-2-1 Method?

This method isn't just for seasoned grillers; it's a perfect starting point for those new to barbecuing. With its straightforward approach, you can achieve consistent results without needing to micromanage. Plus, serving up tender, fall-off-the-bone ribs will surely earn you a barbecue-loving reputation!

Common Misconceptions About the 3-2-1 Method

Some may worry that using the 3-2-1 method can lead to bland or overcooked ribs. However, many seasoned chefs appreciate that the three-step process actually enhances flavor and moisture, rather than detracting from it. It’s essential to balance the cooking time per type of rib; if you're cooking baby backs, a slightly modified approach is recommended—2 hours of smoking, 1 hour wrapped, and 1 hour unwrapped.

Adventure Awaits: Experiment with New Flavors!

The 3-2-1 method is also a fantastic canvas for experimentation. Consider integrating different wood chips for smoking or marinade blends to create unique flavor profiles. You can even try different sauces or glazes in the final hour to surprise and delight your guests.

Join the Community: Share Your Rib Mastery

Participating in home cooking doesn’t just culminate in delicious meals; it's a chance to connect with others who love grilling! Share your experiences, ask questions, or join local barbecue clubs. You’ll find plenty of advice and inspiration to continually elevate your cooking.

As you embark on your rib-cooking journey, remember that mastering any grilling technique takes practice and patience. But with the 3-2-1 method, you have a foolproof guide toward achieving mouthwatering ribs that your friends will rave about!

Food & Travel

6 Views

0 Comments

Write A Comment

*
*
Related Posts All Posts
02.21.2026

Mastering the Reverse-Sear Method for Perfect Filet Mignon

Update Unlock the Secret to Perfectly Cooked Filet Mignon Whether you’re an experienced griller or just starting out, mastering the reverse-sear method for filet mignon can elevate your cooking game to a whole new level. This technique promises not only a tender and flavorful steak but also enables you to create a relaxing atmosphere for your guests by allowing you to multitask while cooking. Imagine serving a meal that echoes the decadence of a fine-dining experience—all from the comfort of your backyard! What is the Reverse-Sear Method? The reverse-sear method is simple yet highly effective. Essentially, you will first cook your filet mignon at a low temperature (around 250°F) until it reaches about 100°F internally and then finish it off with a high-heat sear to create a delicious crust. This technique promotes even cooking throughout the steak, ensuring that it achieves that sought-after juicy and tender center while developing a beautifully crisp exterior. By starting low and finishing high, as expert chef Steven Raichlen suggests, you minimize the risk of overcooking your prized filet. This method requires patience but yields remarkable results. You’ll garner applause from your family and friends for your steak’s restaurant-quality tenderness! The Process: Step-by-Step Guidance Ready to take the plunge? Here’s a simple step-by-step guide to mastering the reverse-sear method: Prep Your Filets: Bring your steaks to room temperature and season generously with kosher salt and freshly cracked black pepper. This allows for better flavor absorption and even cooking. Set Up Your Grill: Configure your grill for indirect grilling by placing the filets on one side and igniting the other to create a smoke environment. Adding oak wood chunks enhances flavor. Cook Low and Slow: Place your seasoned filets on the grill as it reaches 250°F. Use a wireless thermometer to monitor the internal temperature easily. Finish with a Sear: Once the internal temp hits 100°F, remove the steaks and let them rest. Now it’s time to create that coveted crust by searing them on high heat for just a few minutes on each side. A special twist comes from wrapping your filets in bacon and sage, providing extra flavor and elevating the dish to another level. Why This Method Is Worth It The beauty of the reverse-sear method extends beyond just cooking a filet mignon; it’s a technique applicable to various cuts of steak. This versatility makes it an essential skill for any grilling enthusiast. Moreover, the setup of indirect cooking frees you up to prepare sides while your steak cooks, allowing you to focus on your guest experience without being tethered to the grill. Make It a Memorable Meal To create the ultimate steakhouse experience at home, pair your filet with classic sides such as creamy mashed potatoes or roasted vegetables. Don’t forget a touch of seasoning or a squeeze of fresh lemon to brighten the palate. With a little effort, you’ll serve a meal that everyone will remember. Conclusion: Enjoy Your Culinary Adventure! Trying out the reverse-sear method for your filet mignon is not just about cooking; it’s about creating an unforgettable memory around the dinner table. This technique will enable you to deliver gourmet meals while taking an easygoing approach to hosting. Make sure to share your success stories with family and friends, and encourage them to try this method for their next grilling adventure! Are you ready to revolutionize your grilling skills? Start practicing the reverse-sear method today and watch how it transforms your steak nights into expertly crafted culinary experiences!

02.18.2026

Embrace Italian Grilling at Home: Delicious Recipes to Try

Update Discovering the Art of Italian Grilling When thinking of global grilling cultures, Italy might not be the first country that springs to mind. After all, names like Argentina and Japan often dominate the barbecue conversation. But, as Steven Raichlen, a self-proclaimed global grilling authority, passionately advocates, Italy holds a prominent place in the live-fire cooking tradition. With the Winter Olympics showcasing its vibrant culture, now is the perfect backdrop to explore three of Italy’s iconic grilling dishes: bruschetta, bistecca alla Fiorentina, and pollo al mattone. What Sets Italian Grilling Apart? At the heart of Italian grilling is a beautiful simplicity that speaks volumes about the ingredients. Rather than relying on heavy marinades and rich sauces, Italian grill masters elevate the natural flavors of premium meats and seafood through high heat, olive oil, salt, garlic, and abundant fresh herbs. This less-is-more approach truly enhances the raw quality of every ingredient. Italian Grill Classics You Can Make at Home Let’s dive into some quintessential recipes that embody the essence of Italian grilling—perfect for owners looking to spice up their barbecues or perhaps host a cozy gathering during the Olympics. Bruschetta: The Quintessential Starter Bruschetta exemplifies Italian simplicity—a grilled slice of country bread brushed with garlic and olive oil, often garnished with fresh tomatoes, basil, and cheese. This dish brings a taste of the Italian summer directly to your table in just a few minutes. Pair it with a lovely Chianti for the ultimate experience. Bistecca alla Fiorentina: A Meaty Marvel For the main event, consider the bistecca alla Fiorentina, a thick-cut porterhouse steak seared to perfection. Just season the beef generously with salt and a drizzle of quality extra-virgin olive oil. The goal is a rare to medium-rare internal temperature, letting the meaty flavor shine through—a truly indulgent experience. Pollo al Mattone: Chicken Done Right If you're craving chicken, pollo al mattone, or “brick chicken,” provides a uniquely crispy skin and juicy meat. The technique involves flattening a whole chicken under a weight (often a brick), allowing it to crisp up beautifully over the grill. Infuse your dish with fresh herbs like rosemary and sage for that authentic touch. Dining and Watching the Olympics: A Perfect Pairing As the Winter Olympics unfold in Italy, the opportunity to marry stunning performances with breathtaking Italian cuisine is irresistible. These dishes not only showcase cultural pride; they provide a comforting atmosphere for fans nestled in their living rooms or outdoor spaces, tuning in to all the action. Consider creating a little theme night, effortlessly blending the spirit of the Olympics with the authentic Italian culinary experience. Final Thoughts: Uniting Tradition and Modern Taste Whether you aim for a casual evening with family or a vibrant gathering with friends, these Italian grilling principles remind us that food is not just about sustenance but connection, tradition, and joy. With simple ingredients and hearty flavors, embracing Italian grilling methods could transform your next meal into a heartfelt celebration. Now is the time to refresh your grilling skills and delve into Italian cooking—no passport required!

02.14.2026

Transform Weeknight Dinners with Easy Grilling Ideas Ready in 30 Minutes

Update Revitalize Your Weeknight Dinners with Grilling Weeknights can often feel like a race against the clock. Between work, school activities, and other obligations, families frequently find themselves resorting to fast food or take-out. But what if you could make dinner as simple as firing up the grill? With a little planning, you can transform hectic evenings into delightful family meals that are both tasty and quick, often ready in just 30 minutes. Quick-Cooking Proteins for Busy Nights Focusing on quick-cooking proteins is key to making weeknight grilling a successful endeavor. Options like flank steak, pork chops, chicken thighs, and shrimp are perfect choices, as they can be prepared fast and require minimal clean-up. Shrimp, for instance, can be grilled in under 6 minutes, while chicken thighs and pork chops can go from grill to plate in about 20 minutes. Don't forget to complement these proteins with grilled vegetables like zucchini or asparagus, which can be quickly tossed with olive oil and seasoning before hitting the grill. Simple and Flavorful Recipe Ideas Here are some easy recipes that deliver big flavor with minimal fuss: Grilled Chicken Skewers: Marinate chicken pieces in a blend of olive oil, garlic, and lemon juice, thread them onto skewers along with colorful bell peppers, and grill for about 15 minutes. Flank Steak Tacos: Marinate flank steak in a spice rub, grill for 10 minutes, slice thin, and serve with tortillas and fresh toppings. Shrimp Foil Packs: Toss shrimp with seasoning and your choice of vegetables in a foil packet. Seal and grill for 10-12 minutes—easy clean-up and packed with flavor! Enhancing Your Grilling Experience Preparation is essential when it comes to grilling during busy weeknights. Consider prepping marinades or seasoning mixes on the weekends to save time. Also, pre-chopping vegetables in advance can make the grilling process smoother. For sides, consider making a simple salad or grilling some corn on the cob for a complete meal that feels gourmet without requiring hours in the kitchen. Real-Life Success: Families Making Time for Dinner A quick survey revealed that families who embrace simple weeknight grilling often report feeling more connected during meals, encouraging everyone to sit down together—even on school nights. By transforming dinner into an engaging and fun activity where everyone can participate, parents create lasting family traditions around food. Conclusion: Elevate Your Dinners Grilling is not just for weekends or special occasions. Embracing this method of cooking can infuse excitement back into family dinners. Remember, it doesn't take long to create delicious meals that are both memorable and stress-free. So fire up that grill and turn a weekday hassle into a cherished family moment! Looking for more delicious grilling recipes? Explore our extensive recipe index for fresh ideas that will make every dinner a delightful experience!

Terms of Service

Privacy Policy

Core Modal Title

Sorry, no results found

You Might Find These Articles Interesting

T
Please Check Your Email
We Will Be Following Up Shortly
*
*
*